

Increase the Effectiveness of your next guest post with a landing page
What is a guest post landing page?
A guest post landing page is a specific page in your blog that is highly targeted to the intended audience. Here, it’s the readership of a particular blog. Guest posts are a brilliant opportunity for additional traffic and you can capture those readers by offering the content that is relevant to them.
First, you need to decide on the type of landing page you want.
There are three types of guest post landing pages:
1. Blog specific
This is when you create a landing page based on just the one blog. You can even create a different landing page per guest post on that blog. These types of guest pages work best when the blog has a larger readership or is on a very niche topic.
2. Niche specific
This is when the landing page is targeted to a particular niche or sub niche. An example is collating all your posts on e-books, or social media. This is a really effective landing page and is one that requires the least work.
3. Audience specific:
This is the landing page that is targeted at audiences outside of your main niche. Many bloggers recommend blogging outside of your niche to learn more. This can be really effective for capturing the traffic outside of your main readership. This works best if your content is applicable to other audiences.
Once you have decided on your type of landing page, you can then focus on targeting it to that audience.
3 Steps to creating a killer landing page.
Step one: Explain in less than two sentences how your blog can help them.
This is your elevator pitch - a chance to influence how the readers will interact with your site. This is the perfect opportunity to provide a call for action regarding subscriptions. Explain how subscribing to your content would help them. Hint towards the content you will be providing in the future. Mention alternate forms of subscription like twitter or a newsletter.
Don’t be too heavy on self promotion. Quality blog posts are an advertisement in themselves. Your goal is to give them reason to delve into your best content.
Step Two: Link to the 5-12 posts that are highly targeted to that audience.
This is your opportunity to really hook the reader in. You have a couple of choices:
- Posts that are about the blogger.
- Personal case studies that the readers would be interested in
- Guest posts on blogs with a similar readership.
Step Three: Provide a small pitch at the bottom.
In the first step, you explained why the readers should interact with your content. In the second, you encouraged them to interact with your best content. This is the time to capture their interest with a related product or service.
If possible, offer something for free. If you are expecting a large rush of traffic, offer something that is exclusive to that audience. Make those readers want to click on your byline when they see your name elsewhere.
Struggling for ideas?
- Link to a free report.
- Mention your freelancing services.
- Show off your other blogging projects.
- If your landing page is blog specific, link to a product from the hosts blog.
By now you should have submitted your post and got your landing page ready. The final task is to decide how you want to direct the readers to your landing page.
There are two ways to draw attention to the page:
Referrer plugin.
This is a plugin that that identifies where your readers came from and provide a welcome message catered to that audience.
Using such a plugin allows the readers to see you other content while giving them to opportunity to see your targeted posts. I would use this if I linked to a specific article on my blog, or for landing pages that are niche/audience specific. This gives the reader the choice in how they interact with your blog. If you choose this method, make sure to give the reader a reason to click through to your landing page.
Link within the post
This is the best way to really capture the traffic is to provide a link from within the post. I link to it in both the byline and concluding text. Try to provide a
Have you used a guest post landing page? Is there anything else you would like to see on one? Let the readers know in the comments below.
If you want to see a guest post landing page in action, check out Jade’s blog at The Prolific Writer. She is currently seeking guest post opportunities and would love to hear from you.
Add Social Proof to Your Blog With Tweet backs

A few days ago, I created the first implementation of TweetBacks (see the WP plugin here), which is a porting of the idea of trackbacks to Twitter. By first reverse engineering a bunch of the most popular URL shortening services, it then searches Twitter for Tweets that link to your post. These Tweets are then displayed under your original post (either above or below your comments section).
Beyond simply adding a new layer to the conversation and allowing your readers greater flexibility in how they choose to respond to your content, it also adds an important factor in “going viral”: social proof. By showing your readers how many other people have also liked your post enough to share it, you tap into a powerful human tendency towards imitation.
I’ve written about the power of social proof in viral and social marketing before, but this is one of the most direct and effective ways to accomplish this. Tweets are a lower-commitment, easier way to share content than either traditional commenting or blogging, and therefore lowers the bar for your readers to join in the conversation.
Something like 3/4 of all ReTweets include a link, effectively making them a form of TweetBacks. I plan to integrate TweetBacks into myReTweet mapping system, moving towards a more general understanding of ReTweets. If you’re using my javascript-based implementation of TweetBacks, that system will be able to include your blog and content, and you’ll also be able to visually and granularly track its spread through Twitter.
How To - Move 4rom WordPress.com To WordPress.org
Everyday it seems like I find a story or two from a cities local online newspaper which delves into the topic of blogging and what it’s all about. The story usually goes through a mini backlog of history surrounding the term, what blogging is and at the end of the article, there is usually a list of suggestions on how to get started with the most popular suggestion being WordPress.com.

Using WordPress.com is a great way to introduce yourself to blogging but if you decide that you want to turn blogging into a full time job or just want more control over your work, you’ll need to move.
Thankfully, the move from WordPress.com to WordPress.org (WordPress.org being the self hosted version of WordPress) is painless thanks in large part to a great export tool.
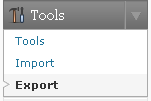 To start things off, login to your WordPress.com account and browse to your administration panel. From the menu on the left, click on TOOLS - EXPORT. At this point, you have the option to confine the export to a particular author or all authors. Using the export tool will compile your posts, pages, comments, custom fields, categories, and tags. This information is placed into a WXR file or, WordPress eXtended RSS file. Essentially, this file is just a normal XML RSS based file with a couple of custom fields added to it which makes it specific to WordPress. Once you’re finished, click on the Download Export File button and save it to your desktop.
Once you have that file on your desktop, you can breath a little easier considering your half way through the content migration process.
The second part of this guide refers to an installation of WordPress 2.7. Login to your self installed WordPress administration panel and from the menu on the left click on TOOLS - IMPORT. From the list of blogging systems click on WordPress. Next, click on the Browse button and locate the XML file you downloaded earlier. This will upload the XML file into your WordPress installation and will unpack all of the data the file contains. There is one caveat though regarding this entire technique.
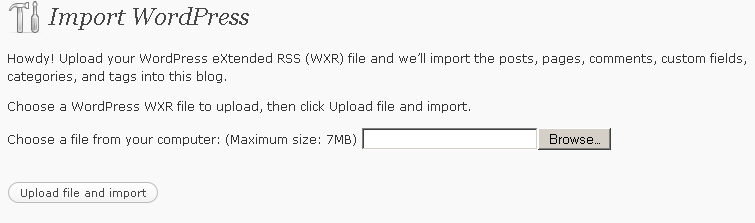 Most webhosts for whatever reason still have their PHP.ini configured in such a way where end users can only upload files with a maximum file size of 2MB or smaller. Although it takes quite a bit of content in an WXR file to go over 2MB, 2MB is not a lot of head room. If you find yourself in the position where your WXR file is larger than the maximum file size, I highly suggest submitting a trouble ticket to your webhost and asking them to increase the limit. If they choose not to, then ask them if they can import the file for you. If that doesn’t work, you can pull a trick from your sleeve by uploading a custom php.ini file to your webhosting accounts root folder. This is what my host did for me and afterwards, I took a look at the php.ini file and noticed it had this line in it:
; Maximum allowed size for uploaded files.
upload_max_filesize = 7M
Apparently, the php.ini file overwrote the settings on the original file and I was able to bump my limit up to 7 Megabytes. This trick is not guaranteed to work. As a last ditch effort, you can also try adding these lines to your .htaccess file. Just replace the pound sign with a number that is above the size of your WXR file.
#set max upload file size
php_value upload_max_filesize #M
#set max post size
php_value post_max_size #M
Once the WXR file is unpacked on your self installed version of WordPress, you’re ready to walk through the gates of freedom without skipping a beat!
P.S. This strategy also works for those wanting to go from WordPress.org to WordPress.com.
Checkout More:
Blog Traffic Exchange and AdSense
Finding Readers for Your Blog (Part 1)
Finding Readers for Your Blog (Part 2)
Finding Readers for Your Blog (Part 3)
Finding Readers for Your Blog (Part 4)
How To Register in Search Engines
Seven Offline Tips for Increasing Blogs Traffic
SEO Tools - Search Engine Optimization
Submit Blog to Blog Directories (I)
Submit Blog to Blog Directories (II)
Submit Blog to Blog Directories (III)
Submit Blog to Search Engines
Submit Blogger Sitemap to Google Webmaster
Submit Blogger Sitemap to MSN and Ask.com
Submit Blogger Sitemap to Yahoo!
Submit RSS Feeds and Pings
19 (More) Tips for Finding Readers on blog
13 Tips on asking other Bloggers for Links
7 Ways to Get to the Top of the del.icio.us Popular Pages
5 Steps 4 Planning the Direction of Your Blog in 2009
The point of the questions was not to engage in a navel gazing exercise but to look back with the objective of identifying how a blog has been performing in order to improve it moving forward.
Today I want to suggest a process for thinking about the future of your blog.
I’m not sure that this process appears exactly like this in any strategic thinking books or teaching but it is the process that I use when I periodically look at how my blogs and business is going.
Here’s a quick visual with some questions to explain each step in the process:
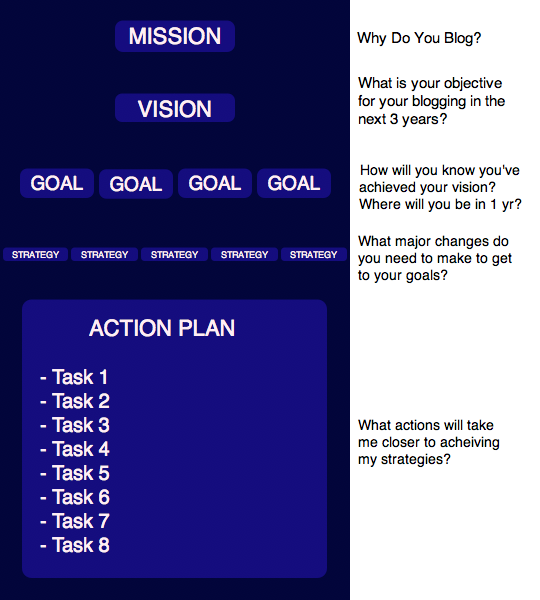
Hopefully the diagram speaks largely for itself but let me extrapolate slightly on each step.
Step 1 - Define your Mission
This is fairly big picture stuff and for me actually goes wider than just why I blog and more fits with my overall life mission. I guess it’s about looking at your overall purpose and direction - what you want to achieve etc. Having this firm in your mind then enables you to work out how blogging fits into that overall purpose.
Step 2 - Paint a Picture of Your Vision
This is still pretty long term and looks beyond the coming year to where you want to eventually take your blog. It’s a picture of a reasonably distant future. Dare to dream a little and think big in this stage.
Step 3 - Make Goals
Now we’re drilling down into the year ahead. Where do you want to be at the end of 2009? Hopefully it’ll be somewhere towards your ‘Vision’ and have helped you to accomplish some of your ‘mission’ - but what will your blog look like, be doing and have achieved this time next year? Dare to think big but keep in mind that it needs to be achievable. You don’t need to have done everything in your vision in 12 months - these goals are stepping stones to the eventual goals.
Step 4 - Devise a Strategy
What are you going to need to DO to get to your goals? Usually this means some kind of ‘change’ in your approach. Do you need to blog more, start a new blog, change your topic slightly, hire a writer, network with other bloggers more, start using a new method for promoting your blog, follow what others are writing more, build community engagement, redesign your blog etc? Think about strategies across the different activities of blogging that will take you closer to your goals.
Step 5 - Set out an Action Plan
Most people set ‘resolutions’ in their lives (and for their blogs) that are quite ‘general’ and wishy washy in nature. ‘I’m going to lose weight’, or ‘I’m going to find a girlfriend’. While these resolutions are great they are often not achieved simply because while a decision is made to do something - the person making the decision puts no actual plan in place for ‘how’ they’ll do it. The same is true for thinking strategically about your blog. ‘I’m going to get more traffic in 2009′ is a great goal - but what are you doing to specifically focus on DOING to get that traffic. Your action plan should be made up of very concrete tasks that you’ll do in the coming months. I will write 5 posts a week - I will email 7 readers each week - I will leave 1 comment per day on another blog in my niche - I will write a guest post for another blogger each month - I will run a competition on my blog in June.
The above 5 steps are the way I approach planning on my blogs (in fact it is how I do it in other areas of my life also). I actually do this for each of my blogs. The mission generally is much the same for each one and at times there are similarities in other steps.
This process will not be for everyone but I think can make a useful starting point for thinking about your blog in 2009. Some personality types will find it easier than others to think this way - actually for me it is not a natural way of thinking - I’m quite impulsive and this is a real effort to do. You might find some steps in the process more natural and quicker to complete than others but thinking things through from the big picture right down to specific tasks will hopefully help you to not only plan but make the changes you need to make in order to achieve your dreams.
More Tutorials:
16 Essential PC Applications for All Bloggers
The Psychology of
Tutorial How to adding Alexa Widget in Blog?
Top 10 Blog Traffic Tutorials
Your Blog's Traffic Formula
8 Daily Tasks To Increase Blog Traffic.
Top 10 WordPress Plugins for New Blogs
How to Turn FireFox 3 Into A Toolbox
How 2 Improve Your Blog When You don’t Have Computer Access
How much Money do Bloggers make Blogging?
Over the last two months I’ve had a sidebar poll running here at ProBlogger that asked readers to tell us how much their blog earned in October of 2008.
This is an annual poll that we’ve run for a number of years now so it is always interesting to see the results.
As usual - the poll revealed that most bloggers either don’t try to make money blogging or earn very little from their blogs but also that a smaller (but still significant) number of bloggers are making at least a part time living from the medium and a few bloggers beyond what most of us would consider ‘full time’.
Of course this is not a scientific poll and it relies upon people interpreting the question correctly and voting honestly - I’m certain that there are inaccuracies in it (particularly with some voting in the top category just for ‘fun’) but the results are actually quite similar to previous years which does make me think that there is at least some level of truth to them.
Take it or leave it - here are the results of this year’s earning poll:
- 37% of those who voted said that they do not make money from their blogs. This category would include both those who don’t want to make money blogging, those who didn’t realize that it was possible, those who don’t have a blog and those who have tried but failed to make money blogging.
While this is a significant and important result I’ve removed category from the charts below so that we can concentrate just on those who make at least some money from their blog.

- 1162 people said that they make under $10 a month. This is a total of 29% of those who make money blogging. This category was 26% in 2007 and 30% in 2006.
- 477 people made between $10-$29 in the month (12%)
- 505 people made between $30-$99 (12%)
- 686 made $100 - $499 over the month (17%)
So to this point we can say 70% of those who make money from their blogs make less than $500 a month and 30% make $500 or more.
- 262 made $500 - $999 (6%)
- 150 made $1,000 - $1,499 (4%)
- 128 made $1,500 - $2,499 (3%)
- 130 made $2,500 - $4,999 (3%)
- 95 made $5,000 - $9,999 (2%)
- 45 made $10,000 - $14,999 (1%)
- 35 made $15,000 - $19,999 (1)
- 373 made $20,000 or more (9%).
The top category probably has some skewing but has always been in this vicinity (9% in 2007 and 7% in 2006 - although in these years the top category was $15,000+). While I’m sure there is some skewing here it is an open ended category so we could expect it to have people earning not only $20,000 a month but also those earning quite a bit more (of which I’m aware of quite a few).
Here’s another chart with the same information:

Once again these figures hammer home to anyone wanting to get into blogging for money that it is not a foregone conclusion that you’ll make a lot of money from the medium. It is possible to make at least a part time income from blogging and for some to make quite a bit of money from it - but over half are earning less than $3 a day (or $100 a month).
For those interested in the comparisons to previous years - let me finish with charts from 2006 and 2007. First here are the 2006 results:

And now the 2007 results:

As you’ll see the results are remarkably similar from year to year although each year we’ve done it the sample size has grown.
How to Get StumbleUpon Users Into Your Blog
StumbleUpon users are, however, notoriously fickle. The service describes itself as allowing you to ‘channel-surf the internet’ and I think it’s a very appropriate description. Users flick through websites like you might flick through channels, often making a decision on whether to stay or leave your site before it has even had time to finish loading. 
In this post, I want to suggest some quick tips you can use to draw StumbleUpon users into your site before they stumble away.
Channel-surfing the internet
We’ve all flicked through TV channels back and forth, waiting for something to hold our attention. The decision to stay on a channel or surf elsewhere is usually made in a second or two, and the principle is the same for StumbleUpon users.
With so many other potentially great sites available to them at the click of a mouse, you need to make it immediately clear why your site is worth their time. Here are some tips to help you do just that.
1. Make your blog’s core mission-statement unmissable
A core mission-statement as I define it is a one or two sentence description encapsulating what your blog has to offer. A good core mission-statement describes the kind of content you provide and broadly what your blog is about. It should communicate a lot of information in only a few words.
If a stumbler can see straight away your blog is about something they’re interested in then they’re likely to stick around.
2. Insert powerful visual cues
When channel-surfing the decision to stick with a channel or move on is often largely determined by visual cues. Even with the sound off you can tell a drama from a news program, a travel show from a cartoon, because visual elements provide clues as to what kind of show you’re watching.
The same principle applies to blogs. If your blog’s header contains an image of a pile of cash, we can reasonably assume the blog is about money (or making it). That’s a lot of information communicated instantly by a single image.
3. Push your content above the fold
StumbleUpon users often judge a site by what is offered in the above the fold area — the area of your site which appears on screen before any scrolling occurs.
I think this blog is an example of how to do that well. Not only do headlines and the first few paragraphs of a post appear above the fold, but other content of interest is showcased in the header area. StumbleUpon users immediately see a site packed with value.
You can use the top part of your blog’s sidebar, its header area and the post area to showcase your content. In doing so, you’ll straight away show StumbleUpon visitors why they should stick around.
4. Be unique, be pretty
While it’s difficult to judge the quality of a blog’s content in just a few seconds, people are much more hasty with aesthetic judgments. A gorgeous or interesting blog design encourages a stumbler to stick around and see whether the content is great too.
Of course, a great design is a lot of work (or quite a bit of money). The next-best thing is a unique logo or header image, an interesting color scheme, and so on. There are a number of small changes you can make to create a blog that looks unique and sets you apart from the crowd.
What we’ve done
The emphasis in all the above tips is on instantly showing visitors who’ve stumbled across your blog what it has to offer. This should help you make the most of StumbleUpon traffic and turn more stumblers into readers.
Checkout More:
How to Migrate from Classic Template to New Template
The steps are as follows. Before changing it, make sure you have backed up your template so if unexpected something happens; you are still able to backup and return to the normal condition.
- Login into blogger with your ID
- Click Template
- Click Customize Design tab
- Click UPGRADE YOUR TEMPLATE button
- Choose your favorite template
- Click SAVE TEMPLATE button
- Finish and now your template has become new template.


- Blog Traffic Exchange and AdSense
- Seven Offline Tips for Increasing Blogs Traffic
- Some Blogger Tips you probably don't know
- Your Blog's Traffic Formula
- How 2 Improve Your Blog When You don’t Have Computer Access